
Our NiCD Force Conversion
Extending our Force's Range with Advanced Batteries
Page 2, "In the year of our lord 2002"
| JUMP TO PAGE 1 | JUMP TO PAGE 3 | JUMP TO PAGE 4 | JUMP TO PAGE 5 |
Welcome to 2002!
Well, it's ridiculous, but it's now April 25, 2002 and it's taken this long to get to the point where I have time available to tackle the rest of the battery installation. To be honest, the other day I was thinking that it would have been smarter to just have shipped the car up to Solectria in Massachusetts and had them do the NiCD upgrade. I don't know if they would have taken the job, but if they did, it would have been done long ago. It would have cost an arm and a leg, but it would be done.
Well, looking at the bright side, not having the Force in a drivable state forced Elizabeth to learn to drive our manual-transmission Honda Insight. She's now a pro at shifting and getting terrific gas mileage. If we had been driving the Force around, there wouldn't have been any incentive for her to learn to drive a stick. OK, so I'm kind of reaching for a bright spot. So sue me.
With remodeling work in my office (started in December 2001) being complete except for a few little details, I decided it was high time to get the Force rolling. I cleared out some space in the garage and sat down with pad and pen and wrote up a list of the tasks that need to be completed to finish the project.
Dashing Ahead
First up on my list of things to do was get the Force instrument cluster and dashboard put back together. On April 20 I grabbed all the instrument cluster parts and the amp-hour counter display and reassembled them, with nearly all the knuckle-busting fun I had in the disassembly last fall. That space behind the instrument cluster isn't spacious by any stretch of the imagination, and I felt like a contortionist trying to snap the speedometer cable back on. But in the end I prevailed, and the dashboard is back together, except for the bottom knee bolster panel. The modifications for the battery charger require that three wires be run to the amp-hour counter control box, and I haven't run the wires yet.
The New Battery Box
It was April 22. The task I'd been dreading for months was no longer avoidable -- I needed to get the new front battery box installed. I was dreading this step because my measurements of the space available to drop the box into the engine compartment were inconclusive -- The box was either going to squeeze into the compartment by the slimmest of margins, or I was going to have to pull out the big Solectria motor, which meant also completely disassembling the front end (dropping the suspension, removing the front wheels and drive shafts, etc.) I did not want to do this, which is probably a big part of the delay in the project.
I knew that at the very least, I was going to have to remove the big aluminum hanger bar that runs between the shock towers over the motor. This bar would have definitely been in the way of the battery box. Since the motor hangs from this bar, I looked at the supports and decided that I could put a block under the motor and remove the hanger bolts without it moving. The front of the car was up on jack stands and was nice and stable, so I cut a 2x4 to the proper length and wedged it into place. I then pulled the two large bolts that tie the motor to the hanger and nothing moved. So far, so good.
I then disconnected everything else from the hanger bar -- DC fusebox, the main DC connector for the motor controller -- Then removed three nuts from above each shock tower and took off the whole hanger bar. In hindsight, I probably should have left the shock tower nuts in place and just removed the aluminum hanger bar itself, but it worked out OK. The main issue here is that the three nuts on each shock tower hold the shocks, and removing the bolts let these drop a bit. No big deal, but they were kind of a pain to lift back up at reassembly time.
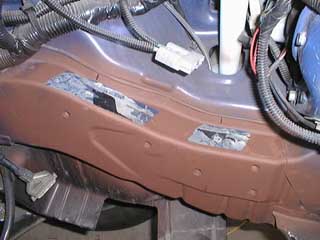
The last remaining thing to get out of the way was the fuel-fired heater unit (photo above). This has a cable that runs back to a control box on the firewall; I removed the control box and loosened some cable ties, allowing me to move the heater around to the driver's side of the vehicle, sitting on a blanket on the windshield, well out of harm's way.
With everything out of the way, I grabbed the battery box and did an initial test drop into the engine compartment. It looked fairly OK, the tightest areas were the front corners, because the car's frame curves back behind the headlights. I put the battery box back on the floor and grabbed a hammer and old chisel, then carved off the remaining adhesive that Solectria had used to attach the battery box to the frame. Then I used some spray primer to re-prime the frame where it had been scratched to bare metal by the Sawzall I had used to cut away the old battery box flanges. I masked off the approximate locations of the battery box flanges so that the epoxy I would use would have something to stick to other than the primer.
That was it for the night. The next day would (hopefully) see the box installed and ready to go.
Boxing Day
April 23 was a busy day. The primer was dry and I was ready to install a battery box. Remembering the tight fit at the front corners of the battery box, I realized that a couple of wire bundles behind the headlights would have to move. I removed some zip ties and made sure the cables had some slack.
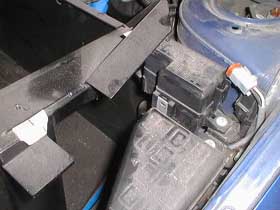
The new battery box didn't have holes drilled in the flanges for the bolts that run into the frame, so I was going to have to locate those. Since the flanges would be in the way once the box was in place, I decided to mark the hole locations using masking tape. I placed long strips of tape along the frame, and drew straight lines through the bolt holes, then made marks to the side to locate the holes in the other axis (you can see the black marks in the photo above). With the battery box in place, I could then use a straightedge lined up with the marks on the tape to mark the flanges for drilling.
Now was the time to start doing the initial battery box fitting. I dropped the box into the compartment and started wedging it carefully into place. The front corners were tight, but there was just barely enough room to slide it past, carefully moving the cable bundles out of the way. About 50% into the job, I realized there were two collisions: On the passenger side, the front mounting flange couldn't get past the vacuum system's reservoir ball, and on the driver's side, the rear flange was hitting the small fusebox.

It was a simple job to remove the box, then remove the two obstacles. Everything else would clear.
I put the box into the compartment again, once again being very careful not to pinch any wiring bundles or the vacuum system hose with the box's corners. It was definitely a tight fit, but it finally dropped into place, resting with its flanges on the frame.
The 'Gotcha'
There was an immediate, painfully obvious problem: The flanges provided on the battery box didn't line up properly with the threaded hole inserts in the frame! The rear holes were OK, but the front flange completely missed the hole on the passenger side by a quarter-inch and the hole on the driver side was only half-covered by the flange. Not good. This thing had to be securely fastened to the vehicle.
I had initially thought that Solectria used standard holes in the frame to mount the box, but I'd say that this isn't the case. They must simply install threaded inserts as needed, and these are in different places depending on the battery configuration. My first thought was to see if I could just install a new set of threaded inserts for the front flanges, but a couple of phone calls to machinist friends didn't lead anywhere. The other alternative was to modify the aluminum battery box, something I didn't want to do but decided was the best option.
Fortunately, I have a pretty well-equipped workshop, which includes a MIG welder and lots of aluminum stock. I cleaned the paint off the front flanges and welded on 1/4"-thick, 1" long extensions, with an additional layer of 1/4" stock overlaying the entire flange for strength. They look pretty nice, if I do say so myself. Of course, this operation required me to pull the box out of the car again, a pretty difficult task considering the tight fit. But once the flanges were extended, I was able to drop the box in again and this time it fit perfectly. I located the holes on the flanges and drilled them in place, by putting wood blocks between the flanges and the car -- I wasn't nuts about the idea of pulling the box out again to drill it!

With the box flanges drilled, I verified the alignment of the holes in the flanges to the holes in the body, cleaned the debris out of the way and mixed the "Titanium" epoxy. This is a five-minute epoxy that's supposed to be super strong. I just wanted to be sure that it filled the voids between the flanges and the frame of the car. Working quickly, I troweled the epoxy under the flanges and tightened the bolts. It worked like a charm, the epoxy squeezing out of the space under the flanges.
At this point, I was eager to reattach the motor to its hanging mount, so I reinstalled the hanger bar and DC fusebox, then reinserted the motor's hanger bolts and removed the 2x4 block. I also reinstalled the vacuum ball and small 12V fusebox that had been removed, and reassembled the motor's junction box.

What I considered to be the biggest hurdle in the car's upgrade was complete. Next up: lifting the rear end and readying the rear battery box!
Back to main EV page
This page last edited August 06, 2002